Sau khi cài đặt, EC2 ở trạng thái running. Click phải chuột chọn connect để lấy thông tin connect SSH, và kết nối vào server.
sudo su -
$ yum install -y java-1.8.0-openjdk-devel.x86_64 // check lại $ alternatives --config java $ java -version
$ wget -O /etc/yum.repos.d/jenkins.repo https://pkg.jenkins.io/redhat/jenkins.repo $ rpm --import https://pkg.jenkins.io/redhat/jenkins.io.key $ yum install -y jenkins // cài lệnh trên lỗi thì sử dụng dưới sudo amazon-linux-extras install epel -y sudo yum update -y sudo yum install jenkins java-1.8.0-openjdk-devel
systemctl start jenkins

// check sau khi start
service jenkins status
yum install telnet telnet localhost 8080
Ec2 bạn mở port security inbound 8080 nhé.
Sau đó vào ip:8080 hoặc domain:8080 để cấu hình jenkins.
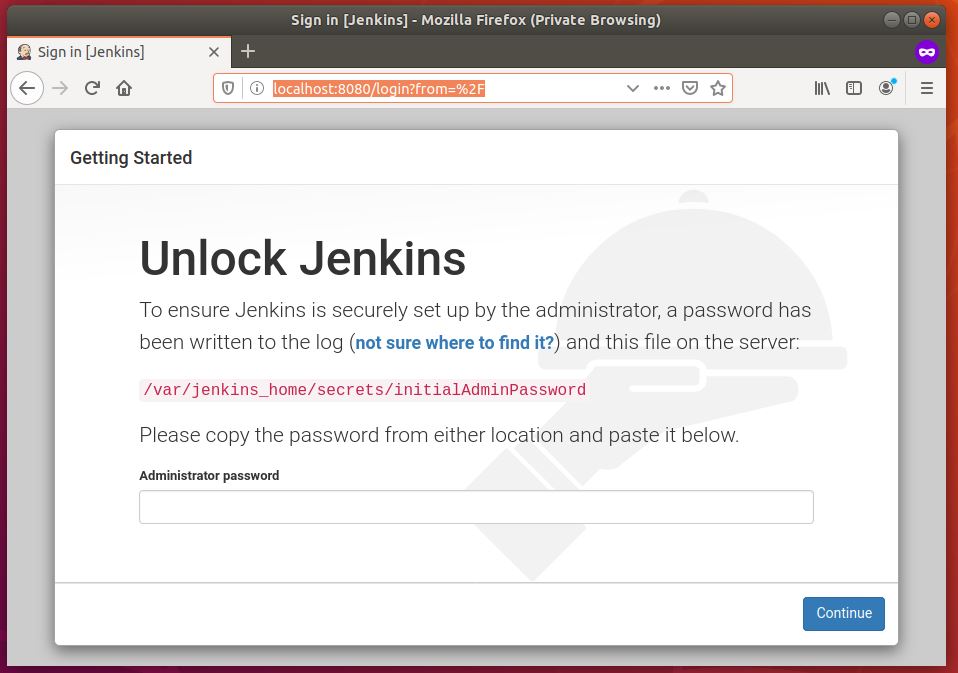
Bạn vào server lấy mật khẩu như đường dẫn trên màn hình hiển thị.
Chọn install suggest plugin.

Đặt tài khoản mật khẩu

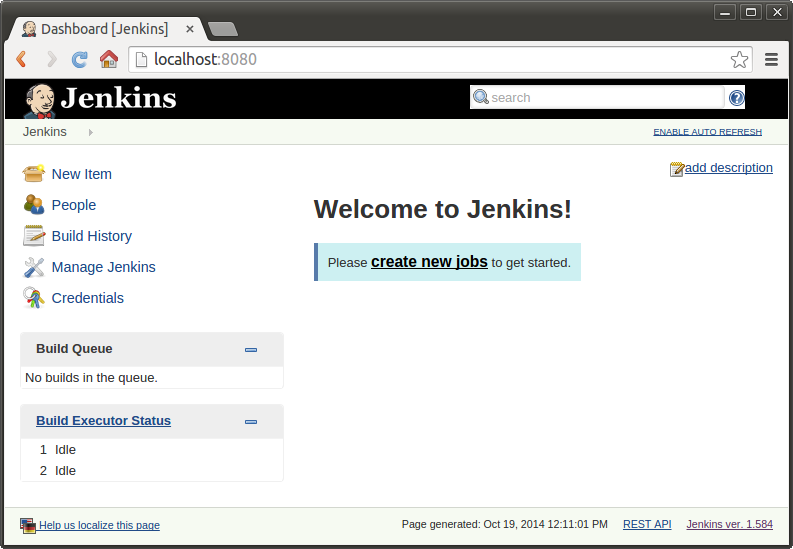
Next tiếp các bước tiếp theo. Ra giao diện này là ok.
sudo su -
4. Cài webserver
#!/bin/bash
yum update -y
yum install httpd -y
yum install git -y
amazon-linux-extras install epel
yum install epel-release
rpm -Uvh http://rpms.famillecollet.com/enterprise/remi-release-7.rpm
yum install -y php70 php70-php php70-php-fpm php70-php-pecl-memcached php70-php-mysqlnd php70-php-xml
ln -s /usr/bin/php70 /usr/bin/php
service httpd start
chkconfig httpd on
5. Tạo user
useradd www-user
6. Tạo thư mục và change quyền
cd /var/www/html/
mkdir tinhocthatladongian
chown -Rf www-user:apache tinhocthatladongian
7. Cấu hình cho apache
vi /etc/httpd/conf/httpd.conf

// Tìm Listen và thêm
Listen 81

// Đến cuối file add
NameVirtualHost *:81
<VirtualHost *:81>
    DocumentRoot /var/www/html/tinhocthatladongian/
    <Directory "/var/www/html/tinhocthatladongian">
      Order deny,allow
      Allow from all
      AllowOverride All
      Require all granted
   </Directory>
</VirtualHost>
8. Restart apache
service httpd restart
9. Chuyển sang account www-user
su - www-user
10. Tạo SSH Key và change quyền 600
$ ssh-keygen -t rsa
$ cd /home/www-user/.ssh/
  // => Đường dẫn lấy từ key tạo ra hiển thị trên màn hình
$ mv id_rsa.pub authorized_keys

chmod 600 authorized_keys
11. cd đến thư mục dự án và clone code
cd /var/www/html/
cd tinhocthatladongian/
git clone https://github.com/tronghao/learn-jenkins.git .
            // => dấu . để clone vào thư mục này luôn không tạo foler mới
12. Lấy private-key server
Nẳm ở file id_rsa của folder /home/www-user/.ssh/
cd /home/www-user/.ssh/
vi id_rsa
13. Server cài jenkins
cd /home/
mkdir jenkins
cd jenkins
vi web-server.pem
chmod 400 web-server.pem

// ra trước thư mục cha chứa nó để chown.
                //Mình từng không cd ra ngoài và mất cả đêm để debug
cd ..
chown -Rf jenkins:root jenkins/
14. Trên server jenkins – chuyển sang user mới (tên-foler lúc nãy tạo)
vi /etc/passwd
//Sửa thành bash như này:
  jenkins:x:996:994:Jenkins Automation Server:/var/lib/jenkins:/bin/bash

su - jenkins
15. Thử jenkins truy cập được máy server chưa
ssh tenUser@[Web Server Address] -i duongdanLuuPrivateKeyTrenJenkins // ví dụ: ssh www-user@ec2-3-94-171-240.compute-1.amazonaws.com -i /home/jenkins/web-server.pem
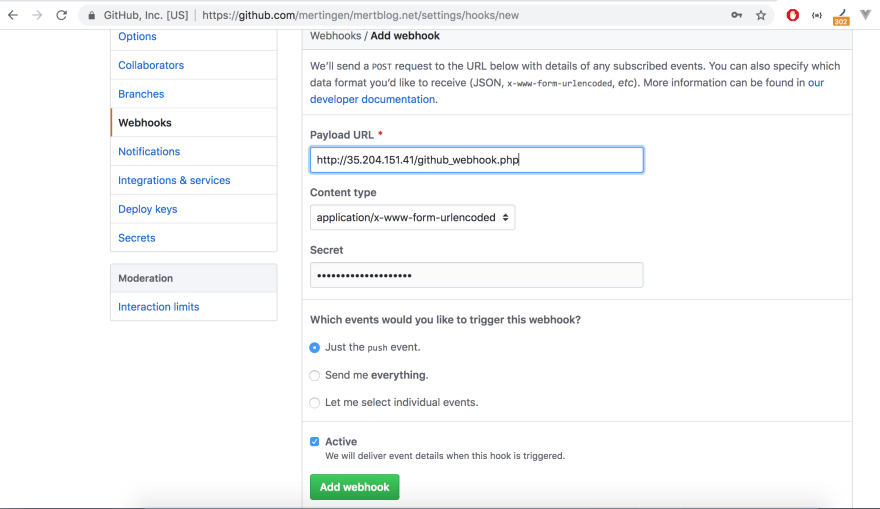
16. add webhook github
Với đường dẫn dạng:
http://[Jenkin URL]:8080/github-webhook/
Ví dụ:
http://ec2-3-95-30-87.compute-1.amazonaws.com:8080/github-webhook/
Cách add webhook github:

17. Cài git cho server jenkins
yum install git -y
18. Tạo jenkins item
#!/bin/bash
su - jenkins
ssh -T -i /home/jenkins/web-key.pem www-user@[Web Server Address] << EOF
cd /var/www/html/tinhocthatladongian
git pull
EOF
19. Build thử
Nhấn Build Now ở jenkins
20. Test lại auto build bằng commit push